
Raising Meat Chickens at Home: A Beginner's Guide to Broilers, Brooding & Processing
A meat chicken isn't just a chicken you decide not to name. The fast-growing breeds most people start with reach a dinner-plate-sized carcass in under two months, which is exactly why the first five weeks of brooding and the feed program you choose matter more here than with a laying flock.
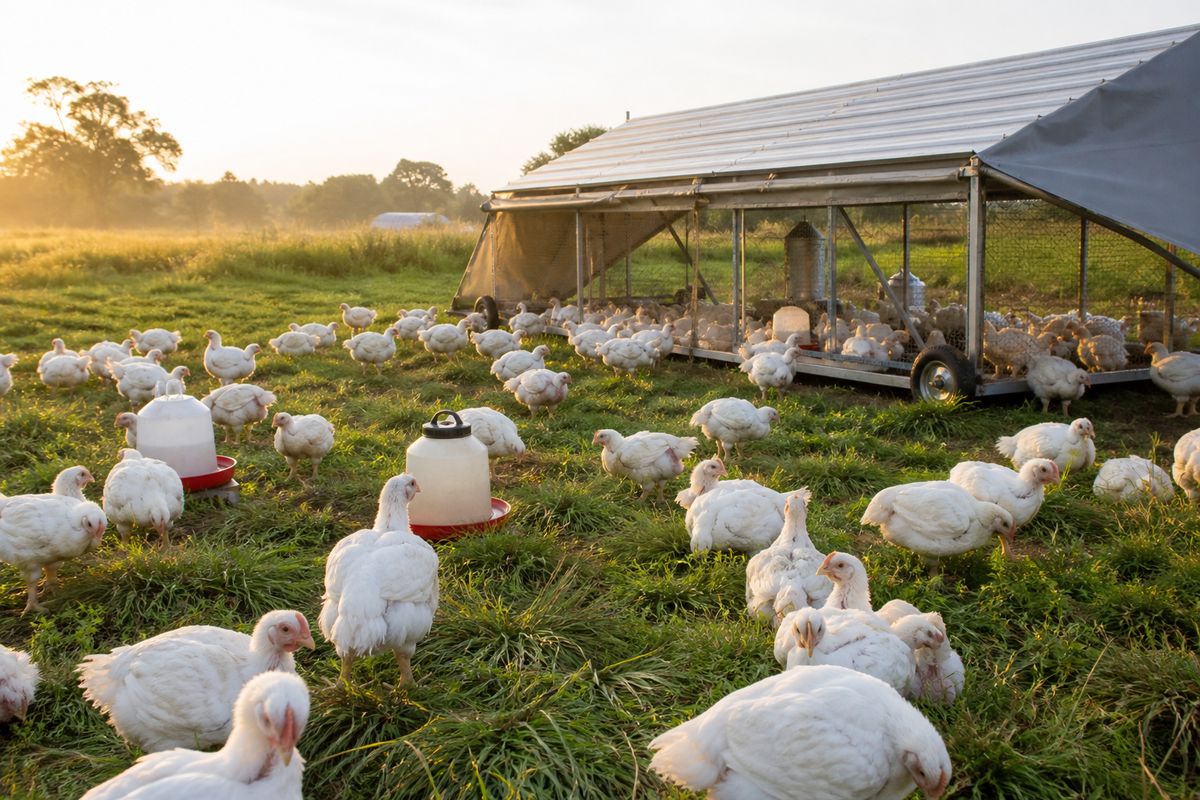
Already raising your broilers in a movable pen? See our chicken tractor guide for the housing side of this system.
Choosing a meat breed: Cornish Cross vs. the slower-growing options
The University of Vermont Extension's small-farm broiler guide lays out the real trade-off beginners are choosing between. The Cornish Cross (also called Cornish Rock) is the industry-standard meat bird: it typically reaches processing weight in 6 to 8 weeks, and a separate source — Oregon State University Extension — describes it growing from about 2 ounces to over 6 pounds live weight in 6 weeks on roughly 10 pounds of feed. That efficiency comes with a cost: Cornish Cross grows so fast that its frame and cardiovascular system can lag behind its muscle gain, so it needs attentive management (clean, non-slick brooder footing, adequate space, and close daily observation) more than any other backyard bird.
Slower-growing alternatives trade some of that efficiency for a hardier bird: Red Rangers are noted for strong disease resistance and flavorful meat; Rosambro and similar medium-growth crosses are usually ready at 8 to 10 weeks; Moyer's Cornish Giants can reach 4+ pounds live by 6 weeks, or be grown on to 8 to 10 pounds as roasters; and true heritage dual-purpose breeds (Buffs, Barred Rocks) grow slowest of all, typically needing 8 to 12 weeks and noticeably more feed per pound of meat. In one grower's trial UVM cites, Freedom Rangers used about 3.17 lb of feed per lb of gain, compared to Cornish Giants at close to 2 lb per lb near 4 to 5 lb live weight — a real difference if feed cost matters to your bottom line, though some buyers do pay a premium for the flavor and pasture-raised story of a slower bird.
Brooding: getting day-olds through the first five weeks
University of Missouri Extension and Mississippi State University Extension's poultry program both describe essentially the same brooding-temperature curve, which is the single most important number to get right in the first weeks of a chick's life:
- Days 1–7: 90°F, or 95°F in cold weather.
- Reduce about 5°F each week after that — roughly 85°F (days 8–14), 80°F (days 15–21), 75°F (days 22–28), 70°F (days 29–35).
- Hold at 70°F from week five onward, keeping supplemental heat on a bit longer in winter so waterers don't freeze.
Don't just set a thermometer and walk away — Missouri Extension recommends judging comfort by behavior: chicks crowding together under the heat source are too cold, while chicks panting, gasping, or spread out as far from the heat as the brooder allows are too warm. If using heat lamps, set them about 18 inches above the birds for the first week and raise them roughly 3 inches each week after, using one 250-watt lamp per 50–75 chicks.
Floor space needs grow quickly as broilers put on weight — Missouri Extension's figures:
| Age | Floor space per bird |
|---|---|
| 0–4 weeks | ½ sq ft |
| 4–8 weeks | 1 sq ft |
| 8–12 weeks | 2 sq ft |
| 12+ weeks | 3 sq ft (light breeds) / 4 sq ft (heavy breeds) |
Feeder and waterer space scales the same way — per 100 chicks, Missouri Extension recommends roughly 12 linear ft of feeder space (two 3 ft feeders) and six 1-quart jar waterers for the first week, rising to 20 linear ft of feeder space and two 2-gallon waterers by weeks 1–4, then 30 linear ft and two 5-gallon waterers by 8–12 weeks. Keep supplemental lighting capped at 14 hours a day during brooding and growing.
Feed program: starter, grower, and why the switch matters
Oregon State University Extension's small-flock meat-bird publication is specific about the protein curve: feed a starter ration at about 22–23% crude protein for the first 2 to 3 weeks, and make sure it's formulated for meat-type birds rather than an egg-type chick starter, which is lower in protein and will slow growth and feed conversion. From roughly 3 weeks to market, switch to a grower ration at about 18–20% protein, which trades some protein for more energy as the birds mature. A medicated starter (containing the coccidiosis preventive amprolium, not an antibiotic) is available and optional — it isn't the same thing as the antibiotic- or hormone-treated feed some people assume "medicated" means. Pelleted feed generally outperforms mash, and feed should be stored dry in closed containers and used within about a month, since old feed loses vitamins and can turn rancid.
Water matters just as much as feed: broilers drink roughly twice as much water as they eat in feed by weight, and significantly more once temperatures climb past 85°F, so clean, cool water needs to be available at all times — don't let water run short to try to "ration" growth. Scratch grain (cracked corn, whole wheat) is a treat, not a feed substitute, and isn't appropriate for young birds; if you do feed whole grains, offer grit separately, since birds on a complete prepared feed don't need it at all.
Pasture and range time
Pasturing broilers is optional, and University of Vermont Extension's guidance is blunt about what it actually contributes: birds on pasture get only about 10 to 15% of their dry matter intake from forage, so a pastured bird still needs its full ration of grain, protein, and vitamins/minerals — pasture adds exercise, insects, and a better story for buyers, not meaningful nutrition on its own. If you're using a fixed range shelter rather than a daily-move tractor, UVM's spacing guidance is: keep shelters at least 150 ft from perimeter fencing and at least 100 ft apart, expect birds to range about 40 ft from the shelter, and move it roughly every 50 ft every 3 to 4 weeks (sooner if the ground within about 5 ft of the shelter gets trampled bare).
Common health problems to watch for
UVM Extension lists the warning signs worth acting on quickly: coughing, sneezing, watery eyes, labored breathing, diarrhea, a pasty vent, and visible external parasites. Get a reliable diagnosis before treating, cull and properly dispose of (burn or deep-bury) any bird that's clearly very sick or injured, and keep a regular deworming schedule. Biosecurity basics — foot dips, dedicated or clean footwear, limiting visitor traffic, quarantining any new or sick bird, and proofing the coop against wild birds and rodents — do more to prevent an outbreak than any treatment does after the fact. On the housing side, Missouri Extension's two biggest flags for fast-growing broilers specifically are the slick-flooring leg-injury risk already covered above, and heat stress: watch for panting and gasping any time temperatures push past about 95°F, and make sure shade and airflow are part of the plan before a hot stretch hits, not after.
Processing day: feed withdrawal and the basic steps
University of Kentucky Cooperative Extension's processing guidance centers on one number worth planning around: withdraw feed 8 to 12 hours before processing, with 6 hours as an absolute minimum. Too short a withdrawal leaves feed in the crop and gut, raising the risk of fecal contamination during evisceration; too long — UK Extension specifically flags withdrawal periods over 14 hours — makes the intestines fragile and more prone to tearing. Water is a different story: keep birds on water as long as possible right up to processing, especially in hot weather, since water matters far less to contamination risk than feed does.
The basic sequence Extension describes: catch birds at night or early morning when they're calmest, carrying them by both legs (no more than three per hand) to avoid bruising from wing-flapping; crate at roughly 8 birds per crate in summer or 10 in winter, using crates kept off the ground; scald at about 140°F (too hot partially cooks the breast meat, too cool makes feathers hard to pluck); then eviscerate carefully, keeping the heart, gizzard (with its inner membrane peeled off), and liver while discarding the spleen and gall bladder — handle the gall bladder gently, since spilled bile will stain the liver. Any bird that dies before bleeding should be discarded rather than processed. Finally, chill carcasses in an ice-water bath until they reach 40°F or below, which should take under 4 hours, before draining and packaging.
The short version
Pick Cornish Cross for speed and feed efficiency, or a Red Ranger-type cross for a hardier, slower bird with more pasture appeal — either way, the brooder's first five weeks (starting around 90–95°F and stepping down about 5°F a week) and non-slick footing matter more to a good outcome than anything else you'll do. Feed a real meat-bird starter and grower rather than general-purpose or egg-layer feed, give birds the floor space their age calls for, and when processing day comes, hold feed for 8 to 12 hours (never past 14) while keeping water available right up to the end.
A numbered procedure, not just a feeding chart
This article covers the reasoning; the Pastured Broiler SOP & Record Book Bundle turns it into a repeatable system — a 3-page numbered Standard Operating Procedure (materials, safety, step-by-step daily moves, a troubleshooting table) plus a 9-page Record Book for brooder logs, daily pasture/move tracking, weekly growth and weights, feed and mortality, and processing yield. Building the pen itself? See our chicken tractor guide, or the Chicken Coop Build Guide and Chicken Flock Record Book for a stationary setup.
Browse the shop →More Chickens & Poultry guides
Free tool: Chicken coop size calculator →
- Sources:
- University of Vermont Extension — Growing Broilers
- Oregon State University Extension (PNW 658) — Small-Flock Meat Bird Nutrition
- University of Missouri Extension (G8351) — Brooding and Rearing Baby Chicks
- Mississippi State University Extension — Brooding Chickens and Quail
- University of Kentucky Cooperative Extension (ASC-210) — Processing Poultry Products